|
|
Using the Mealplannerby Peter D'Adamo, ND, MIFHI | Welcome | Upper Bar Area | Mealplanning Area | Menu Area | Making a Mealplan | Special Functions | Welcome to SWAMI Mealplanner 2.0This updated software is a complete re-write of the original SWAMI Mealplanner. If you would like to use the earlier version you can access it by clicking on this link: New Interface SWAMI Mealplanner 2.0 features a new user interface, with an intuitive 'drag and drop' selection method. It is divided into the basic sections. Let's begin by having a look around. Upper Bar AreaThe Upper Bar area looks like this:  From left to right we see:
Mealplanning AreaThe Mealplanning Area is where you construct your mealplan for the week. It looks like this:  You'll notice that the Mealplanning Area is designed to look like a weekly calendar. On top we have the rows that describe the days of the week, and along the left edge we have a column that lists the five types of meals you can plan for: three main meals (Breakfast, Lunch and Dinner) and two snack. Morning and Afternoon). You meal-plan by dragging and dropping 'meal tags' from third area (The Menu Area) onto the Mealplanning Area. The Menu AreaThe Menu Area area is where you select foods and meals to add your mealplan for the week. It looks like this: 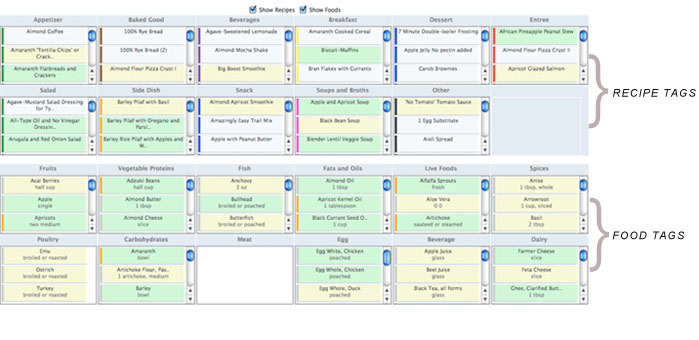 The Menu area is divided into two types of 'meal tags': Recipe tags and Food tags. Recipe Tags Recipe tags comprise the first two rows of choices. This class of tags is comprised of any allowable recipe that does not contain any 'avoid' foods as per your SWAMI Diet Report. Recipe tags are classified by the major category of the recipe:
The background color of the Recipe tag can also alert you to the benfits of the recipe:
Food Tags Food tags allow you to add individual foods and ingredients to your mealplan. These are ranked in accordance with your SWAMI Diet Report. Like Recipe tags, Food tags convey information based on the stripes and background colors:
Making a MealplanConstructing a mealplan is simple and intutive. Here is an example of how to do it: Select a Recipe or Food Tag We will start with an appetizer. Using the scroll bars for the Appetizer category, we see that our Diet Report allows us to use the 'Broiled Lime and Soy Mushrooms' recipe, which has a green background, meaning that it has three or more super-food ingredients in it. 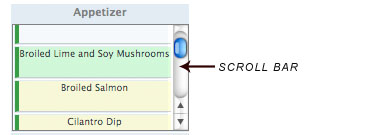 But we want to know a bit about the recipe before we add it to the mealplan. If we 'hover' our mouse over the recipe title we will see a quick description of the recipe. In this case the description tells us that this recipe is a 'Great appetizer or entree accompaniment.' Not much info. However if we click on the recipe title, a popup window will appear that shows us the recipe.  OK, we're sold! Let's add it to the mealplan. We do this by dragging the recipe tag to the Mealplan Area. Move the mouse over to the left side of the tag , where the stripe is. Your mouse cursor now changes into the 'grab' cursor (usually a grabbing hand icon):  Now, while holding down the left mouse button, we 'drag' the Recipe tag. Remember to drag from the left side of the tag, by the colored stripe. If the tag does not move around while you hold down the mouse button, you may have hovered over the 'name-link' area rather than the 'hover' area. We are going to add the 'Broiled Lime and Soy Mushroom' recipe to the 'Monday Dinner' slot. As we drag the tag over the menu area, the target cell will change to orange, allowing you to be certain of the location you will be dropping into.  When the orange cell for Monday-Dinner lights up, release the mouse button and magically the recipe is now scheduled for Monday Dinner. You build up a meal by adding any number of recipe tags and food tags to the meal slots. Dragging a new tag to a slot that already contains a meal tag adds the new tag to the slot.  Special FunctionsCloning Tags We often eat the same foods or use the same recipes on multiple days of the week. One easy way to reuse tags without having to find them by scrollign around the various category windows is to 'clone' a copy of a particular tag you need in multiples. For example, we might start each morning off with a cup of green tea. If we already had a tag for Green Tea in the Monday Breakfast slot we can simply clone this tage by holding down the SHIFT key while we grab the 'Monday Breakfast Green Tea tag' and dragging it to the 'Tuesday-Breakfast' slot.  Compliance Points Dragging a tag to any active cell will activate the 'Compliance Counter.' This will count the total of beneficials or superfoods (diamond icon in your diet report) that have accumulated for the day. One (1) compliance point is awarded for any single beneficial food tag or the total of all beneficials foods in each recipe tag. Two (2) compliance points are awarded for each single superfood tag and for each superfood contained in a recipe tag. Compliance points are displayed in the compliance point row.  Sorting Trays Sorting trays give you a convenient 'staging area' from which to design your mealplan. Dragging recipe and food tags from the Menu Area to one of the sorting tray areas and then cloning copies to use in the Mealplanning area is a quick way to build up a weekly mealplan. However, the contents of the sorting trays are not stored when your mealplan is saved. The Trash Bin Dragging a tag to the Trash Bin Slot (the area with a 'waste basket' icon) deletes the tag. However if you change you mind and want to use the tag, you can just drag another copy from the Menu Area. Showing and Hiding the Menu Areas At the top of the Menu Area are two checkboxes that allow you to show or hide parts of the Menu Area. Turning parts of the Menu Area on or off can be a helpful way to keep the entire SWAMI Mealplanner work area in your browswer window. Ticking the 'Show Recipes' checkbox will display the Recipes section of the Menu Area and ticking the 'Show Foods' checkbox will display the Foods/ Ingredients section of the Menu Area. These can be combined as needed. Saving Your Mealplan Pressing the 'Save Mealplan' button will collect the information from the SWALI Mealplanner Editor, save it to a file, and send you to the Printout Page where you can print out the mealplan, an ingredients list for shopping, and whatever recipes are being used in the mealplan. Press the 'Print Mealplan' button to send the output to your printer. Note that saving a SWAMI mealplan always overwrites the previous file. |